Thursday, September 13, 2012

The Quest Continues...But I Saved the Shirt!

 Lately, I've been on the hunt for the perfect denim shirt or jacket.  They go with practically everything and they are definitely "in" right now.  When my mom put an old denim shirt in the "to get rid of" pile, I snatched it and decided to try to alter it to fit me.  If I ruined it, no big deal.  And no, I didn't ruin it, but I came close a few times.  (I didn't take a before picture of just the shirt, but I wore it in this post, so you can see it there.)
 
I don't have a full tutorial for you, but here's a few tips that may or may not be helpful. 
 
First of all, put your shirt on inside out and pin it around your body so that it fits you the way you like it.  Then sew along where you've pinned. 
 
Ideally, you could save the sleeves, but I wanted to take them in, so I cut them off and then got too lazy and frusterated to figure out how to put them back on properly.  So I settled for a vest instead.
 
The arm holes gave me problems.  I thought I should just sew up the sides leaving an armhole the size I wanted, but when I did that, the chest no longer fit right.  So I ripped it out and sewed it up with the original arm hole size.  Then it fit in the front, but the armholes were huge and gaping.  Grr.  All that to say, darts are your friend and not that hard.  Just make a dart from the sleeve going in.  It will fix your shaping problems if you do it right.  Again, try it on and pin it while you're wearing it.


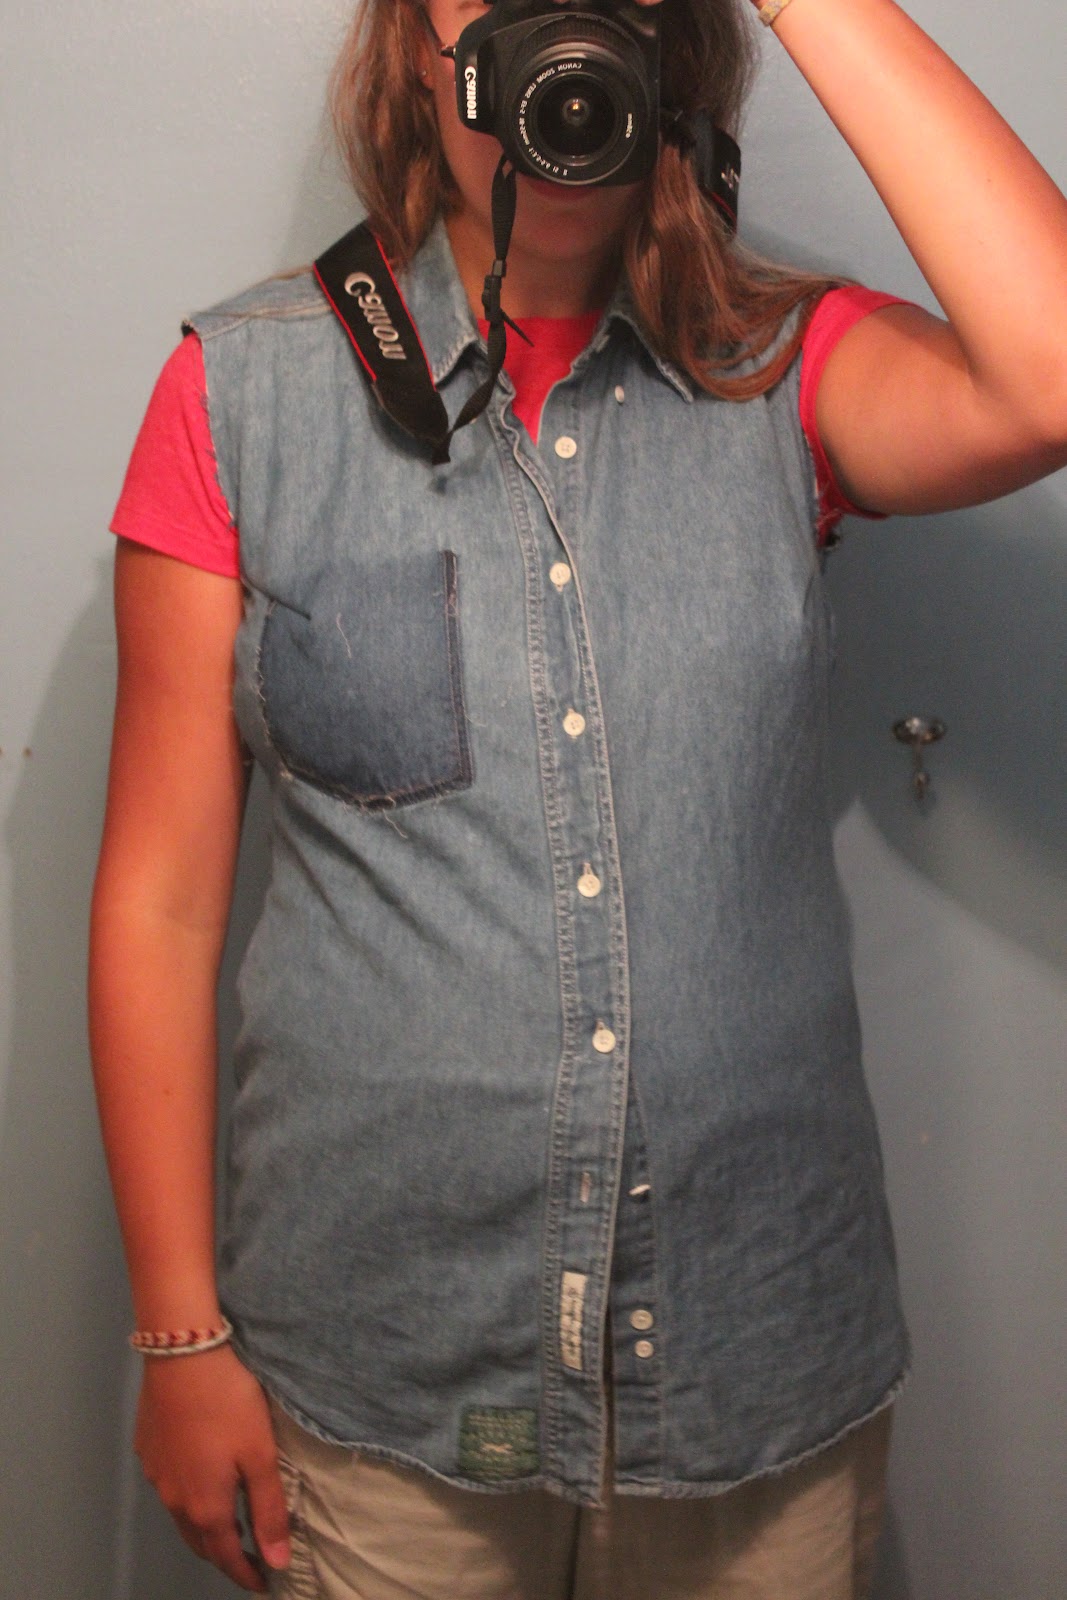
 After you sew on your darts, try it on to make sure they're even. Mine weren't, so I tried again. And I had to take off the pocket to sew the darts, hence the big ugly spot. Once I got the darts right, I just sewed the pocket back on.
 
 
Hem the arm holes, fix any broken buttons (I had to...) and adjust the length of the shirt if desired.  And you're done!


 See?  It fits waaaay better now.
 
 
 Although it wasn't what I had envisioned, it's not horrible.  I saved it and turned it into something I can wear without looking like a tent.  Always a bonus.  :)  I also may add some contrasting pockets or something to this shirt sometime as well.
 
And here's a sneak preview (a.k.a. really bad picture) of the results of a half hour in one of my favorite little thrift stores.  If you live in the area, check it out!  It's called Chase Me Again and it's located in downtown Gresham.  Their prices are extremely reasonable and the best part is that all the proceeds go to local charities!
 
 
I got a pair of red granny shorts (all shorts were $1 today!) that I plan to turn into a skirt tomorrow, a leather purse (I've been wanting one for a while), and three books (books were 1/2 off today!).  I know that this is unrelated to my shirt refashion, but I was a little excited about my finds.  ;)
 
Thanks for hanging with my long-ish post!
 
Niki

Wednesday, September 12, 2012

From Stem to Stern


 I LOVE the nautical trend.  I loved it before it was cool.  ;)  I've always adored the ocean, the beach, seashells, ships, ect.  And a few years ago, my best friend and I decided that an (imaginary) tall, dark and handsome sailor was the love of my life.   Oh yes.  Be jealous.  :)  So I adore the whole nautical theme.  Partly because I adore my imaginary sailor boy.  Kidding.  Sort of.... ;)
 
And in case you were wondering, this skirt is the mystery project I hinted at the other day in my post about dyeing.  I found five yard of this wonderful striped fabric at Goodwill for $5 and knew it would be a wonderful skirt.  And I still have a bunch left for other projects!  I don't have a tutorial for you, because I was just kind of winging it, but this is good one.  I'm pretty happy with the way it turned out, but I'm debating making the skirt a little narrower because it tends to look a little too full around the hips.  Thoughts?

Stripes are very sailor-esque, so I paired my new skirt with a shirt with an anchor design on it.  (One of my favorite, most comfortable shirts, by the way.)  I added a belt to pull it all together.  And of course, a fish tail braid. 
 
I would love to style this skirt with a white t-shirt and cardigan or something too, but I need to buy a white tee first.  I know.  Shocking as it is, I do not own a white t-shirt.  That needs to change. 
 
How do you feel about the nautical trend?
 
Niki
 
Skirt: self-made.  Anchor shirt: Old Navy (clearance!) Belt: thrifted.  Shoes: thrifted.  Hair: fishtail

Tuesday, September 11, 2012

Everybody Everywear Back to School


I put together this back-to-school look for this month's Everybody Everywear challenge.  I started with the skirt because I thought it was perfect for the theme, being plaid and all.  I made it out of a men's shirt a while ago, but I had trouble with the waistband, so I didn't wear it much because it ended up being too big.  But today, I realized I could fix it with some wide elastic from one of my recent projects.  It was an easy fix, and I will wear it much more now.  :) 

This outfit was slightly out of my comfort zone, but hopefully stretching myself will be a good thing.  That's kinda one of my goals for this blog.  To develop my own personal style and to explore new possibilites with my clothes. 

Is it hard for you to break out of your comfort zone when you get dressed in the morning? 

Niki
 
Skirt: refashion.  Shirt: refashion/thrifted.  Shoes: thrifted.  Belt: thrifted.  Scarf: gift.  Hair: sock bun
Back To School | Everybody, Everywear

Monday, September 10, 2012

That Awkward Moment When...

You realize you've been spelling your own blog URL incorrectly in all the comments you've left people.  Yeah.  Brilliant, Niki, brilliant.  ;P  In my defense, the incorrect way was the way my super old/never used blog URL was spelled.  If that makes it any better.

(No wonder I was having problems with Bloglovin!)
Follow my blog with Bloglovin

The Day I Died...I Mean "Dyed"....

Dyeing.  It's all over Pinterest and DIY blogs right now.  Everyone is dying shirts, jeans, you name it.  I decided to try my hand at it because I needed some navy blue elastic, which of course, I couldn't find.  While I was at it, I stuck in two tank tops (one for my sister and one for me), a woven belt, and a pair of old tights.  They were looking awesome until I washed them afterwards like the directions said.  Most of the color faded out and I ended up with a gray blue color.  It's a lovely color, and I adore the way the tights turned out, but it wasn't what I had planned.  Fortunately, the elastic looks okay for the project I was doing. (More on that later) 
 
I used Rit Navy Blue dye and I followed the directions, so what happened?  I've used Rit dye once before for a tie-dye project, and it faded and bled then too.  I've heard other people have wonderful success with Rit dye, so why didn't it work for me?  Any tips?
 
 
See?  Cute tights.
 
 
 And a sneak peek of a project that you'll probably see me wearing very very soon. ;)
 
Niki

Sunday, September 9, 2012

Where's the Party?


The party dress.  You probably have one lurking in the back of your closet too.  The dress that you love, but feels a little too formal for regular wear.  And if you're like me, you don't get invited to fancy parties every weekend.  But I wasn't content to let this dress languish in the closet.  It hasn't fit me for a while, but now that I've lost some weight I was eager to wear it again.  I decided I would find a way to casual-afie it.  (I actually bought two of the exact same dress a while back because they were only like $10 each.  The other one's purple.  So that's double the reason to find a casual way to wear them, right?)
 
Here's what I came up with:


I broke the unwritten rules of fashion blogging (ha!) and wore the scarf-vest again.  When I find something that works and that I like, I wear it a lot.  I don't think that's a problem.  :)    I think strapless dresses can feel a little formal sometimes, so the scarf-vest helped with that and made this outfit more church-appropriate.  I wore my trusty blue flats, but you could go even more casual with some canvas tennies if you wanted.  That's what I would do if I was going on errands or something instead of to church. 
 
So what do you think?  Have I inspired you to give your party dress a second chance?
 
Niki
 
Dress: Romy (super cute store, by the way, if you live in the area)  Scarf: gift.  Shoes: thrifted

Wednesday, September 5, 2012

Leather Bow Cuff Tutorial


This lovely little cuff made its debut a few days ago in one of my outfit posts.  Ain't she cute?  :)Anyway, today I'm going to show you how to make your very own!


This picture that I discovered on Pinterest was my inspiration.  I saw it, I loved it, and I knew I had to make one.  So here's how I did it.
 

You will need:
  • 2 strips of leather/pleather. (I picked my faux-leather up as a remnant at my local fabric store.)  The main strip needs to be long enough to wrap around your wrist with a little overlap and as wide as you want it to be.  Mine was about 3 inches wide.  The smaller strip is to wrap around the middle of the bow, so as you can see, it's pretty small.
  • A hot glue gun
  • A snap
  • A needle and thread

 
I made a hair bow using the same technique to demonstrate how to make the bow.  I studied a pre-made bow, and from there figured out how to make the traditional bow shape.  I made it so that there are 3 "mountains" and 2 "valleys", if that makes any sense at all.  :P

 
Once you have shaped your bow, wrap the other strip of leather around the pinched section and glue in place.  If you're making a hair bow, you're done.  Slip a bobby pin through that bad boy and wear with pride. 
 
 
Ta-dah!  But wait, if you're making the bracelet, keep reading!
 
 
To finish the cuff, wrap it around your wrist to figure out where to put the snap. Sew on the two halves of the snap, and you're done! 
(After I made the bow on my cuff, I ended up trimming it a little to make the bow a little rounder and the ends narrower.  This wasn't necessary, I just thought it looked and felt better that way. )
 
 
I love way my cuff turned out.  I've been wanting a leather cuff of some sort for ages, and this one is feminine and slightly edgy at the same time.  This definitely has potential to become a new favorite accessory of mine.  These would make wonderful gifts as well!
 
Thanks for reading!
 
Niki
 
(EDIT: The hot glue did not hold up very well.  You might want to do a few hand stitches instead to band in the middle of the bow together.)

Monday, September 3, 2012

Summer Vacation and a Pity Party

Hey, just a quick post to let you know that I'll be out of town until the 7th on one last summer family vacation.  It's going to be a blast, but I just didn't want you freaking out or anything at my absence.  ;)  I do have a pre-written post coming while I'm gone though, so stay tuned for that.  It's a tutorial that you may not want to miss. 
 
Secondly, I wanted to tell you a quick sob story.  Don't panic, it's not that bad.  But you know that lovely sheer green top I refashioned a little while ago?  Well, I lost it.  It's vanished.  I've searched my whole house for it, but I can't find it!  I haven't even had a chance to wear it yet and summer is quickly vanishing.  I'm a little bummed.  Hopefully it didn't get thrown away or anything weird like that.  It'll probably turn up right in time for cold weather to set in.  That's ok.  I'll still find a way to wear it.  So there you go.  Such a huge problem, right?  ;)
 
Well, have a wonderful few days and I'll see you again soon!  Did you do anything fun for Labor Day?
 
Niki

Sunday, September 2, 2012

The Amazing T-Shirt Scarf!

Sooooo...please excuse the awkward-self-portrait-style pictures in today's post.  Hopefully you will still find the styling tips useful.  :)
 
I made this scarf a few days ago from a XXL t-shirt I got at Old Navy for 97 cents.  (Yeah, 97 cents!  That particular color and style of t-shirt was on clearance.  I bought 7.  1 for each of my sisters, and a few extras for projects.)  Sorry, that was a rabbit trail...Anywhoo.  To make this scarf, I just cut the bottom of the shirt off right under the arms.  Bam!  Instant infinity scarf. 
 
So then I decided to explore some ways to wear it:


The double loop.  A classic.

 
 The turban twist.  Instead of doing a half twist before doubling it, do a full twist.  You end up with a knotted/twist thing in front.

 
This is the turban loop version, but around my head, like a real turban.  :)

 
Ok, so this one may not work unless you're cruising down Route 66 in a red convertible.  But hey, I can dream.  :)


You can wear the scarf over your shoulders as a sort of shawl.  Maybe over a dress?  I did a half twist in mine just to add a nice twist detail to the front and back.

 
Lastly, the faux bolero jacket.  Put the scarf around your waist/chest, then pull the front over behind your neck.  You'll probably want to use a safety pin or two to hold the back edges together, kind of like the scarf vest from yesterday's post.
 
This just goes to show that you never know what you'll come up with if you just spend a few minutes playing around with your clothes!

Niki

Saturday, September 1, 2012

No-sew Scarf Vest. Are You Serious?

 
See my awesome new vest?  Let me tell you a secret.  It's a scarf.  Yep, a scarf.  One of my favorite scarves is now a favorite vest.  I was inspired by this article I found yesterday, and decided to try one of their 10 ideas.  So I turned my scarf into a vest.  Non-permantently!
 
 
It's super simple!  You just tie the two top corners together, and catch some of the middle of the scarf in the knot as well.  I don't know if you can tell from the pictures very well, but it's super easy to figure out.  I promise.


I will definately be wearing me and my mom's larger scarves this way alot.  It's a simple way to dress up an outfit and get more wear out of those wonderful scarves.  I love this idea.  It's the perfect example of how a little creativity can go a long way when it comes to remixing your wardrobe. 
 
Well, I'm off to have a Pride and Prejudice marathon with a friend.  Bye for now!
 
Niki
 
Striped shirt: Kohl's.  Jeans: Levi's.  Shoes: thrifted.  Necklace: Claire's.  Scarf-vest: gift from my best friend.  It's from Disneyland.  :)